

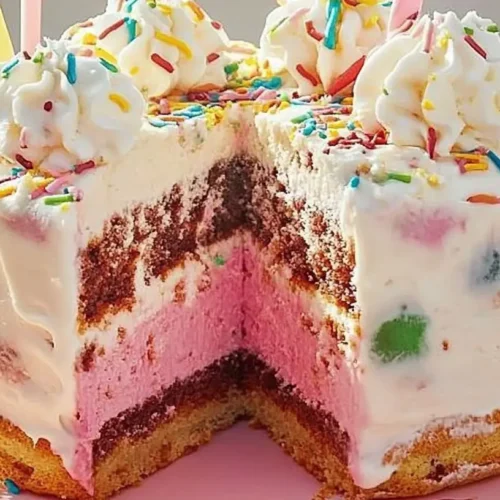
There’s something truly magical about birthdays, especially the desserts that celebrate them. I can vividly remember the delightful summer days of my childhood, with my mother whipping up our favorite birthday ice cream cake. As I mixed the ingredients, the air filled with the sweet aroma of vanilla and sugar, while sprinkles danced in the sunlight. Fast-forward to today, and I still find joy in making this nostalgic treat for my family and friends. Whether it’s a birthday, graduation, or simply a day that calls for something sweet, this cake brings smiles all around. Let me take you through my cherished recipe that’s perfect for creating new memories!
Why You’ll Love This Recipe
- Nostalgic Appeal: This birthday ice cream cake is sure to remind you of childhood celebrations, evoking warm memories with every bite.
- Quick and Easy: With simple steps and minimal cleanup, you can whip up this cake in no time. It’s perfect for those busy days!
- Versatile Treat: Not just for birthdays—this cake makes a wonderful graduation cake or a fun surprise for any occasion.
- Make Ahead Option: This cake can be made in advance and stored in the freezer, making it a great choice for stress-free entertaining.
Ingredients
To create this sweet masterpiece, you’ll need:
- Granulated sugar
- All-purpose flour
- Kosher salt
- Baking powder
- Baking soda
- Large egg
- Vanilla extract
- Vegetable oil
- Buttermilk
- Multi-colored jimmies (sprinkles)
- Strawberry ice cream
- Heavy cream
- Confectioner’s sugar
Full ingredient list with measurements is provided in the printable recipe card below.
How to Make the Recipe
Making this birthday ice cream cake is a delightful process, and I can’t wait to share it with you! Here’s how I do it:
- First, preheat your oven to 350°F. Spray two 8-inch round baking pans with nonstick baking spray and line their bottoms with parchment paper. This helps in easy removal.
- In a large bowl, whisk together your dry ingredients: sugar, flour, salt, baking powder, and baking soda.
- In a separate medium bowl, mix together the egg, vanilla, and oil until well blended. Then whisk in the buttermilk.
- Combine the wet ingredients with the dry ingredients, stirring until everything is nicely mixed. Don’t worry if it looks a bit lumpy; just make sure there are no huge clumps! Now, fold in half a cup of those adorable sprinkles.
- Divide your batter evenly between the prepared pans. Bake for 18 to 20 minutes until the tops are set and a toothpick comes out with moist crumbs.
- Let your cakes cool in the pans for about 10 minutes before transferring them to a wire rack to cool completely for about an hour.
- While the cakes are cooling, take the strawberry ice cream out of the freezer and let it soften for about 10 minutes—a perfect time for those sprinkles to dazzle in the sun!
- In another 8-inch round pan (sprayed with nonstick spray), line it with plastic wrap. Scoop in 1¾ pints of the softened ice cream, and sprinkle with 2 tablespoons of sprinkles. Press down firmly to eliminate air pockets and make it smooth. Add the other 1¼ pints of ice cream on top, using the rest of the sprinkles, and repeat the pressing and smoothing process.
- Now it’s time to freeze that lovely ice cream for 2 hours or even up to a day!
- When you’re ready, prepare the whipped cream by beating heavy cream and confectioner’s sugar until you have stiff peaks. Place it in the fridge to chill for a bit.
- To assemble, place one cake layer on your serving plate. Remove the frozen ice cream layer from the pan and flip it onto the cake. Remove the plastic wrap, then place the second cake layer on top. Spread half of the whipped cream over the top, swirling it like a fluffy cloud. Use the remaining whipped cream to dollop around the edges and sprinkle generously with colorful sprinkles.
- Finally, return everything to the freezer for at least half an hour before serving. Trust me, this cake is worth the wait!
Pro Tips for Making This Recipe
- For an even smoother batter, make sure your buttermilk and egg are at room temperature before mixing.
- To avoid cracks in the ice cream layer, allow it to soften just the right amount before layering it into the pan.
- If you want to jazz things up, try adding a layer of chocolate sauce or crushed cookies between the ice cream layers!
How to Serve
This birthday ice cream cake truly shines on special occasions. Serve it alongside some fresh berries or a scoop of extra ice cream. For beverages, a glass of chilled lemonade or a fruity punch complements the sweetness beautifully. When it comes to plating, using a hot knife to slice through the cake makes for clean cuts—less mess, more delight!
Make Ahead and Storage
You can prepare this cake up to 2 days in advance, stored covered loosely with plastic wrap in the freezer. The flavors meld beautifully overnight, often making it taste even better the next day! If you have leftovers, it will keep well for about another two days. However, I guarantee it will vanish quicker than you can say ‘birthday cake’!
FAQ
Can I make this gluten-free? Absolutely! Just substitute the all-purpose flour with a 1:1 gluten-free blend.
What if I don’t have jimmies? No worries! You can use any type of sprinkles, or even crushed candy bars for a fun twist.
Can I use an air fryer instead? While I haven’t tried it personally, you can certainly experiment with baking the layers in an air fryer; just ensure they are baked at the right temperature and time.
I hope this birthday ice cream cake brings as much joy to your table as it does to mine. Whether you’re celebrating a birthday or planning a graduation cake, I’d love to hear how yours turns out! Let me know in the comments below, and enjoy every delicious bite!
Birthday Ice Cream Cake
Equipment
- 8-inch round cake pans
- Mixing Bowls
- Mixer
- Cooling rack
Ingredients
Cake Batter
- 1 cup granulated sugar
- 1 ¼ cups all-purpose flour
- ¼ tsp kosher salt
- ¾ tsp baking powder
- ¼ tsp baking soda
- 1 large egg room temperature
- 1 ½ tsp vanilla extract
- ¼ cup vegetable oil
- ¾ cup buttermilk room temperature
- ¾ cup multi-colored jimmies divided
Ice Cream Layer
- 3 pt strawberry ice cream
Whipped Topping
- 1 cup heavy cream
- 2 Tbsp confectioner's sugar
Instructions
- Preheat the oven to 350°F. Spray 2 8-inch round baking pans with nonstick spray and line the bottoms with parchment paper.
- In a large bowl, whisk together sugar, flour, salt, baking powder, and baking soda.
- In a medium bowl, whisk the egg, vanilla, and oil, then mix in buttermilk.
- Combine buttermilk mixture with flour mixture and fold in ½ cup of sprinkles.
- Divide batter between pans and bake for 18-20 minutes until tops are set.
- Allow cakes to cool for 10 minutes in the pans before transferring to a rack to cool completely.
- Soften strawberry ice cream at room temperature for about 10 minutes.
- Prepare an 8-inch round pan with nonstick spray and plastic wrap. Layer 1 ½ pints of ice cream, sprinkle with 2 Tbsp of sprinkles, then add the remaining ice cream and sprinkles, pressing down.
- Freeze the ice cream layer for at least 2 hours or until ready to assemble.
- Beat heavy cream and confectioner’s sugar until stiff peaks form and refrigerate.
- Assemble by placing one cake layer on a plate, topping with ice cream layer, then the second cake layer.
- Spread whipped cream over the top and edge, sprinkle colorful jimmies, and return to the freezer for 30 minutes before serving.