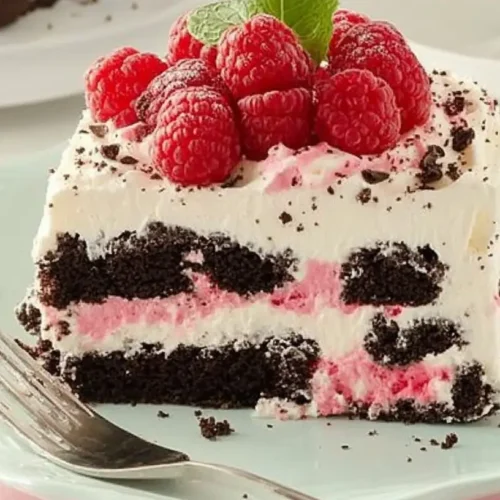
I remember the first time I tasted an Oreo Icebox Cake — it was a sunny afternoon, I was at a friend’s graduation party, and the delicious dessert stole the show! The layers of chocolatey goodness, fluffy cream, and tart raspberries created a symphony of flavors that danced on my tongue. As I devoured each spoonful, I felt a wave of nostalgia wash over me, reminding me of carefree days filled with laughter, love, and celebration. That day, I promised myself I would recreate that magic, and I’ve been making this heavenly dessert ever since.
Why You’ll Love This Recipe
- Quick prep: You won’t spend all day in the kitchen; this dessert takes minimal effort!
- Family-favorite: A timeless treat that appeals to both young and old — perfect for gatherings!
- Comforting flavors: The combo of Oreos, cream, and fresh raspberries will warm your heart!
- Make-ahead friendly: It tastes even better after sitting in the fridge, so it’s ideal for busy days.
Ingredients
Here’s what you’ll need to whip up this delightful Oreo Icebox Cake:
- Cream cheese — for that creamy, rich base.
- Powdered sugar — adds the perfect level of sweetness.
- Vanilla extract — enhances the overall flavor profile.
- Heavy cream — essential for making that luscious whipped topping.
- Chocolate sandwich cookies — ideally Oreos, for the classic chocolate crunch.
- Raspberries — to introduce a burst of tartness and color.
Full ingredient list with measurements is provided in the printable recipe card below.
How to Make the Recipe
Now, let’s dive into the joy of creating this gorgeous cake!
- Start by taking out your stand mixer (this is where the magic happens!). Beat the cream cheese on medium speed for about 1 to 2 minutes until it’s nice and smooth.
- Add in the powdered sugar and vanilla extract. Gently beat on low speed for 30 seconds, and then increase to medium speed for another minute until it’s beautifully combined.
- Take a spatula and scrape down the sides to catch any remnants of deliciousness. Now, add 1 cup of heavy cream and mix on low until smooth. Follow that with the remaining 2 cups of heavy cream — it’s time to whip it into shape! Turn the speed up to medium high and beat until soft peaks form, which should take about 1 to 2 minutes.
- To assemble your cake, spoon about ¼ cup of the cream mixture into a 9-inch square baking dish, smoothing it out into an even layer.
- Now, layer on the chocolate cookies, breaking some as needed to fit perfectly. Then, spread about 1½ cups of the cream mixture over those cookies, followed by an even layer of raspberries from 2 containers. Add another layer of cream mixture, then a final layer of cookies, and end with the rest of the cream mixture smoothed over the top.
- Cover it with plastic wrap and let it chill in the fridge for 4 to 12 hours. This time is crucial as it allows everything to meld beautifully!
- Before serving, decorate with crumbled cookies and the remaining raspberries. Slice with a serrated knife and enjoy the fruits of your labor!
Pro Tips for Making This Recipe
- To ensure a perfectly smooth cream, mix slowly at first to avoid splashes.
- Feel free to switch out raspberries for other berries like strawberries or blueberries if you prefer.
- Don’t rush the chilling time; the longer it chills, the better the flavors will meld together.
- Be careful not to overwhip the heavy cream; it should have soft peaks and be light and airy!
How to Serve
The Oreo Icebox Cake is incredibly versatile. Here are some serving ideas:
- Pair it with a cup of coffee or a glass of dessert wine for a lovely afternoon treat.
- This cake is perfect for graduations, summer barbecues, or family gatherings — it’s a guaranteed hit!
- For an added touch, garnish each slice with a few fresh raspberries or a sprinkle of cocoa powder.
Make Ahead and Storage
This Oreo Icebox Cake is the kind of dessert that keeps on giving. Here’s what you need to know about storing it:
- Leftovers can last up to 3 days in the fridge — if you even have any left!
- You can freeze the cake, but it’s best to do so before adding the raspberries and toppings. Thaw before serving.
- The flavors truly blend and taste even better the next day; it’s like a little time capsule of deliciousness!
FAQ
Can I make this gluten-free?
Absolutely! Just use gluten-free chocolate sandwich cookies, and you’re all set.
What if I don’t have raspberries?
No worries! You can substitute with any berry you love, or even omit them entirely for a classic chocolate flavor.
Can I make this in advance?
You can prepare this cake a day ahead! The flavors develop beautifully when chilled overnight.
I hope this Oreo Icebox Cake brings as much joy to your table as it does to mine. It’s perfect for celebrations, family get-togethers, or just a sweet escape on a quiet afternoon. Let me know how it turns out — I’d love to hear from you! Enjoy every creamy, crunchy bite. Happy baking! Thank you!


